Portability Analyzer New !!install!! «FULL ✔»
The BCD Store file is usually located in the Boot folder of a Windows 7/8.1/10 OS's System Reserved partition; which in many cases will not even have a drive letter assigned to it. So if you really want to see where these system files are located, you'll first need to go into Disk Management and give that partition a drive letter. (Note: Some OS distributions, such as the 'Embedded Standard' editions, do not have a separate System Reserved partition.) Apart from possibly needing to add a drive letter, all system files are by default hidden from view, so you'll also need to change the Folder Settings to show hidden system files. But, since the BCD file is kept open by the OS, you wouldn't be able to open it to look at it anyway! However, you can use the BCDEDIT program to make a backup copy of the BCD file which you can then open with a hex editor (to see everything) or even NOTEPAD (to see all the readable characters). [Contents of a real BCD file are linked below.]
Portability Analyzer New !!install!! «FULL ✔»
If you enter "bcdedit" at a simple Command Prompt window, you'll probably see:
The boot configuration data store could not be opened. Access is denied. |
Because you need Administrator privileges to access the BCD file with BCDEDIT. So, be sure to run the Command Prompt ![]() using a RIGHT-CLICK and selecting:
using a RIGHT-CLICK and selecting: ![]() ("Run as administrator").
("Run as administrator").
The following is what you would typically see when entering the command bcdedit all by itself:
C:\>bcdedit

Windows Boot Manager
--------------------
identifier              {bootmgr}
device                  partition=\Device\HarddiskVolume1
description             Windows Boot Manager
locale                  en-US
inherit                 {globalsettings}
default                 {current}
resumeobject            {ad68f292-2870-11e3-9c80-856fbacd7f33}
displayorder            {current}
toolsdisplayorder       {memdiag}
timeout                 30

Windows Boot Loader
-------------------
identifier              {current}
device                  partition=C:
path                    \Windows\system32\winload.exe
description             Windows 7
locale                  en-US
inherit                 {bootloadersettings}
recoverysequence        {ad68f294-2870-11e3-9c80-856fbacd7f33}
recoveryenabled         Yes
osdevice                partition=C:
systemroot              \Windows
resumeobject            {ad68f292-2870-11e3-9c80-856fbacd7f33}
nx OptIn |
Note that the Boot Manager program (bootmgr) is often located in a volume without a drive letter, such as in this example, but it could have one. If there were only one partition on the drive, then it would appear in the C: partition.
The following is a dump of a Windows™ 7/8 (or Vista) Administrator console (Command Prompt window) after entering "help bcdedit" ("bcdedit /?" will give the same):
Portability Analyzer New !!install!! «FULL ✔»
The versatility of new portable analyzers is also enabling solutions for specialized markets:
: Run the command ApiPort.exe analyze -f -t ".NET Core" to scan your files.
Review the generated compatibility report. Focus heavily on:
The new portability experience is baked right into Visual Studio. By right-clicking a project and selecting "Upgrade," developers trigger a sleek, UI-driven portability analysis wizard. It visualizes dependencies, highlights high-risk components, and tracks your migration progress in real time. How the New Analysis Process Works portability analyzer new
Old analyzers: cpuid checks. New analyzers: Read LLVM/Go assembly output to detect AVX-512, SHA extensions, or ARM SVE. Then compare against target CPU profiles (e.g., AWS Graviton2 vs. Graviton3).
: It can be run as a Visual Studio extension (for versions 2017 and 2019) or as a standalone console application ( ApiPort.exe ) for automated or offline use. 2. Current Status & Transition
The tool analyzes the APIs and types used in your application and compares them against target platforms. The versatility of new portable analyzers is also
The flood of new products in 2025 and 2026 is not just about individual features; it represents several overarching trends that are reshaping the industry.
Master the Move: A Complete Guide to the New .NET Portability Analyzer
Newer tools allow developers to select specific, cutting-edge targets, including the latest .NET versions and modular platform extensions, enabling side-by-side installations that don’t break existing functionality. How to Utilize a New Portability Analyzer New analyzers: Read LLVM/Go assembly output to detect
, Technical Director at Crowcon, highlighted the seamless integration of intelligent design and engineering, noting that every feature has been developed with purpose, from modular sensor architecture to robust field-ready construction. This award-winning recognition underscores the importance Crowcon places on pushing gas detection forward.
The trajectory of "portability analyzer" technology points toward . We are moving toward a world where analysis is not confined to specialized spaces but is a continuous, on-demand capability.
Because the backend service for ApiPort has been shut down, you must use it if you still choose to run it. Microsoft Learn How to Use the (Legacy) Portability Analyzer
Elements like old configuration systems ( ConfigurationManager ) or HTTP modules that require modern alternatives (like Microsoft.Extensions.Configuration or Middleware).
Note: What you see above is exactly how a Vista/Win7/8 display appears; and, yes, the word "Command" in the last heading was spelled wrong by Microsoft, it should be plural (Commands) just like all the others. And if there really was only one, then the word "control" should have had an 's' after it! This was still true for a Windows 7 SP1 install we examined, and even Windows 8.1. Is this a case of "If it ain't broke, don't fix it!"? Apparently, the cost of qualifying a revised program outweighs this grammatical error.
And even though Windows™ 10 added six new commands (shown in white below), they doubled the same grammatical error (shown in red). Now it's incorrect for both of the last two command types:
The versatility of new portable analyzers is also enabling solutions for specialized markets:
: Run the command ApiPort.exe analyze -f -t ".NET Core" to scan your files.
Review the generated compatibility report. Focus heavily on:
The new portability experience is baked right into Visual Studio. By right-clicking a project and selecting "Upgrade," developers trigger a sleek, UI-driven portability analysis wizard. It visualizes dependencies, highlights high-risk components, and tracks your migration progress in real time. How the New Analysis Process Works
Old analyzers: cpuid checks. New analyzers: Read LLVM/Go assembly output to detect AVX-512, SHA extensions, or ARM SVE. Then compare against target CPU profiles (e.g., AWS Graviton2 vs. Graviton3).
: It can be run as a Visual Studio extension (for versions 2017 and 2019) or as a standalone console application ( ApiPort.exe ) for automated or offline use. 2. Current Status & Transition
The tool analyzes the APIs and types used in your application and compares them against target platforms.
The flood of new products in 2025 and 2026 is not just about individual features; it represents several overarching trends that are reshaping the industry.
Master the Move: A Complete Guide to the New .NET Portability Analyzer
Newer tools allow developers to select specific, cutting-edge targets, including the latest .NET versions and modular platform extensions, enabling side-by-side installations that don’t break existing functionality. How to Utilize a New Portability Analyzer
, Technical Director at Crowcon, highlighted the seamless integration of intelligent design and engineering, noting that every feature has been developed with purpose, from modular sensor architecture to robust field-ready construction. This award-winning recognition underscores the importance Crowcon places on pushing gas detection forward.
The trajectory of "portability analyzer" technology points toward . We are moving toward a world where analysis is not confined to specialized spaces but is a continuous, on-demand capability.
Because the backend service for ApiPort has been shut down, you must use it if you still choose to run it. Microsoft Learn How to Use the (Legacy) Portability Analyzer
Elements like old configuration systems ( ConfigurationManager ) or HTTP modules that require modern alternatives (like Microsoft.Extensions.Configuration or Middleware).
BCD Editor EXAMPLES:
If you ask for help on the "/export" switch, you'll see:
C:\>bcdedit /export /?

bcdedit /export <filename>

This command exports the contents of the system store into a file.  This file
can be used later to restore the state of the system store.  This command is
only valid for the system store.

<filename>          The filename to be used as the destination for the export.
                    If the filename contains spaces, it must be enclosed in
                    quotation marks ("").

Example:

The following command exports the system store to the specified file:

bcdedit /export "C:\Data\BCD Backup" |
So we tried the following and saw it was successful:
C:\>bcdedit /export "C:\Users\<your user name>\Documents\bcdtemp.bin" The operation completed successfully. |
After examining this backup file in our Documents folder (using HxD), our first reaction was: "Man,
this thing appears to be full of all kinds of needless 'gunk'!" It even saves the path and filename to this backup file, inside the file
itself!
Then we compared it to the original BCD file by making a copy of that file while the OS was offline (connected as a slave drive to a
different OS), and found there were MANY differences! So, the 'backup copy' is not really a true copy. And the differences go well beyond simply
changing the path name of its location.
So why is this file so 'cluttered' compared to the Windows XP boot.ini file? Its first 4 bytes
are a big clue: "regf". Reason: The BCD file has the same format as a Windows Registry hive! (For example, the NTUSER.DAT
file begins with the same 4 bytes.) And in fact, once a Windows Vista/7/8 OS has actually started booting-up, it loads the BCD file into the Windows Registry
at: HKEY_LOCAL_MACHINE\BCD00000000.
BOOTMGR Experiments:
What happens if we change the NT Disk Signature on a Windows 7 disk drive?
To test this, we used a disk editor to alter the bytes at offsets 0x1B8 through 0x1BB in the MBR (first sector of the disk drive) by simply adding 1 to each byte. If you attempt to boot a PC after doing that, you'll see the following BLACK error screen:
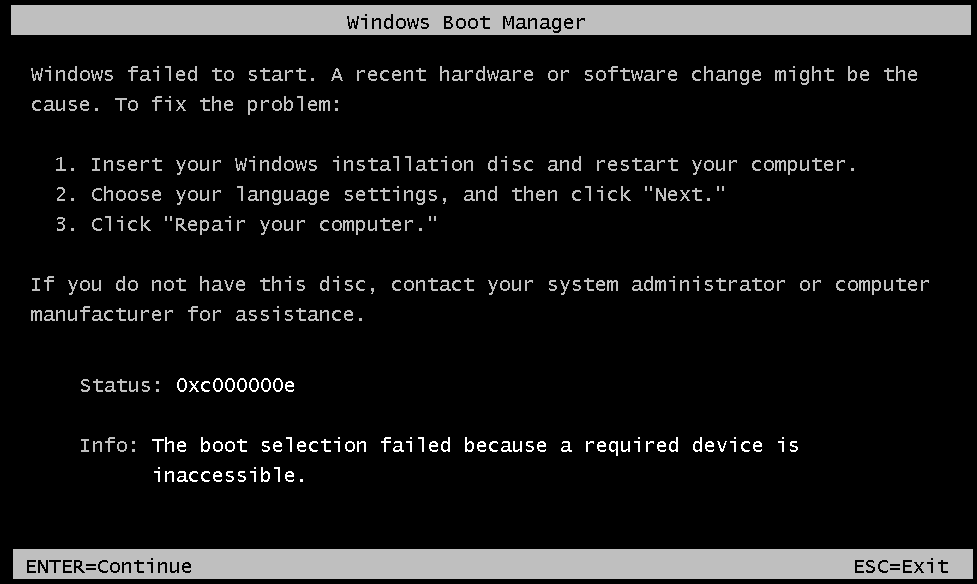
In previous Windows versions, the OS would still boot up this way; even though there was the
possibility some program that used the Disk Signature could then have problems. Note: The same error message, with Status: code of 0xc000000e,
will also be displayed if we change those NT Sig. bytes to all zeros! Only if you edit these bytes back to their original values will the PC boot-up again.
It's also possible to see such an error if your PC is somehow directed to start booting from a drive other than the normal boot drive, and the BCD
Store on that drive points to the first drive, which will obviously contain a different Disk Sig. than what is stored in that drive's BCD. Most PC BIOS have
a 'Boot Menu' (often accessible using the F12 key at boot-up) which temporarily makes whatever drive you select, be the first drive on the PC, so a
Windows 7, 8.1 or 10 OS on that drive will not have this error! (Note: Unless you plan on always keeping an original Windows OS drive
and a new Windows OS drive both connected to your PC, you should never do a new OS install with any other drives connected
to the PC!) Why? Because new Windows OS installs often make changes to a primary disk drive, even when installed to a secondary drive! Disconnect all
but the disk drive you intend to install a new Win OS on, and in the future you will be able to boot-up the new drive all by itself (or using a Boot Menu key)
without it depending upon some primary disk drive you decided to remove, or that has failed.
NOTE: The error shown above is a function of the bootmgr program! We know this, because the same error message will be displayed after
altering the NT Disk Signature on a drive that has had its entire C: Volume (where the actual Windows OS resides) removed! So, the Boot
Manager must check the NT Disk Signature before it even looks for the presence of the C: Volume.
But how does bootmgr know what those hex
bytes should be?
Answer: After examining both our copy and the original BCD file, we found the NT Disk Signature there, in the same
order as found in the MBR Sector, no less than 9 times. For our small test install of a new Windows 7 OS, this shows
where those bytes occurred (highlighted with a pink background color); along with all the other data contained in a BCD Store file.
Note: The \Boot folder of your System Reserved partition will also contain a few LOG files: BCD.LOG, BCD.LOG1 and BCD.LOG2, but the numbered files are often empty. This LOG file is a copy of the BCD file, having the same location
written inside it and all the general indications of a BCD Registry file, but about half its bytes may be different.
Have fun examining your own backup BCD copy.
Why is it so difficult to move the C: Volume under Windows 7 or later?
To clarify: Under most previous Windows installs, such as Windows 98, people who performed multi-booting or simply had many different partitions on their
PCs often used a program called Partition Magic to shrink or even completely rearrange the layout of partitions on their disk drives. But attempting
to change where the C: Volume begins under Windows 7 results in a similar BLACK screen error as above; including the same exact message: "Info: The boot selection failed because a required device is inaccessible." But with a different code: "Status: 0xc0000225."
[Note: This is true whether the correct location
is specified in the Partition Table or not; same Status code will be shown in either case. In fact, we doubt that bootmgr even looks at the
Partition Table, provided it can find the C: volume where it is supposed to be!]
This problem is similar to the one above (concerning the NT
Disk Signature), but involves the exact sector location of the C: drive's partition.
So where in the BCD file, is the sector location of the
Windows Boot Sector stored?
The reason for the question being: Although we can find our drive's NT Disk Signature in the BCD Store, we can
not find a sector location for the C: drive! Before searching, we had thought only the
BCD file would need to be updated if we moved the C: Volume. We knew how partitions are referenced in a Windows REGISTRY (see NTFS Disk Signature), but could not find any similar bytes; other than the 4 bytes of the NT Disk Sig., in our BCD file! So how
does bootmgr know where the sector offset location of a C: drive should be, and prevent booting from an OS volume we simply moved and did
not resize; even though the data in both the Partition Table and its Boot Sector (Hidden Sectors which give us sector offset to Boot Sector) have
already been updated?
NOTE: All of the following is still under construction . . . mainly because we have yet to find a solution that allows one to effectively move where a Windows 7 OS's C: drive partition begins! After using a Microsoft install DVD to REPAIR such a drive, although it did allow us to boot-up that drive and use it, the repair did not change anything permanently! After attempting to boot-up the drive again, the same error message is displayed, no matter how many times we used the DVD to 'repair' the drive!!.
Could it be as simple as the OS already having accessed the REGISTRY; with much of the system already running in Memory, it then finds the offset stored
there does not match the values in the Partition Table and/or Boot Sector, so it gives us essentially a false message, stating: "The boot selection
failed because a required device is inaccessible."? Yet, the bootmgr program could only know that if it did find and
access the Registry.
Other Experiments:
2. We next carried out the following steps on a copy of our Windows 7 OS install in order to verify our theory about why Windows 7 does this:
A) Copy the hidden file bootmgr and various folders (including "Boot\enUS" and "Boot\Fonts") from the
"System Reserved" partition to the root directory of the C:\ drive. Note: Five or six files must be 'skipped' when doing this, because the
BCD Store (and associated files) will remain in use by the OS (preventing them from being copied)!
B) Create a copy of the BCD file
in C:\Boot by using this command (as Administrator): bcdedit /export C:\Boot\BCD
C) Change the
MBR Sector, so the main OS partition is the 'Active' partition.
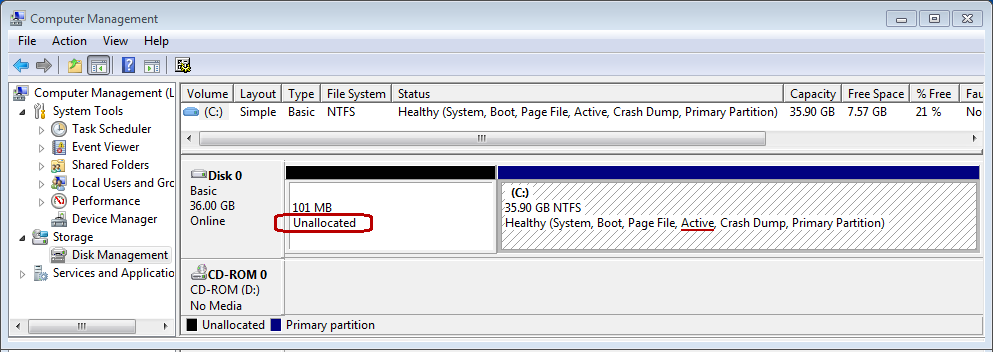
After that we were able to boot-up the OS from only the C: drive. In order to prove
this is true, we used HxD to zero-out the entry in the Partition Table for the System Reserved partition. (Note: The reason we did not
use Windows to 'delete' the partition, is because that could have ruined being able to access it again in the future. By saving those hex bytes elsewhere
and zero-filling the entry, we can simply enter those bytes in the table again, in order to restore and access the partition!) Upon rebooting and opening
the Disk Management utility, one can graphically see this is true:
D) We shrank the size of this Volume (C:) to only 8 GB in order to run the next test below.
What about BOOTSTAT.DAT and BOOTSECT.BAK files?
E) shift the beginning of the C: drive to where the System Reserved partition had been, by correcting the data in both the
Boot Sector (VBR) and the Partition Table; not to mention, actually moving the Boot Sector and its following Volume Boot Record sectors as well